Tuesday, May 28, 2013

Bacon, Blue, and Spring Onion Twice Baked Potatoes


Is there a savory foods combo that pairs better, and with more versatility, than bacon and blue cheese? It's a delicious flavor combination on everything from pizza to salads to potato soup. The salty-crispy bacon, and pungent, funky blue cheese in the recipe definitely adds a wallop of flavor to the otherwise mild and creamy potato. It's an easy-peasy recipe, and can even be made in advance and frozen for super-simple future dinners. 


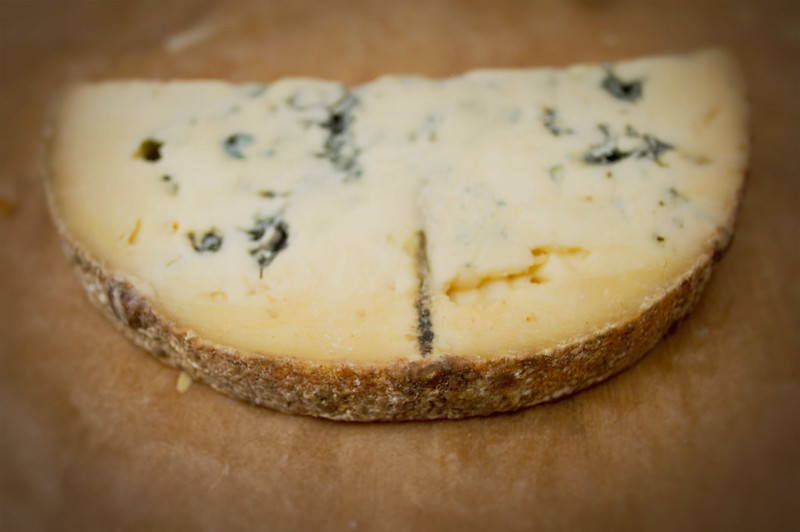
There are many, many types of blue cheese out there, though I think most people associate the closely with just a few types. There's Gorgonzola, the funky italian blue commonly seen adorning salads with thick, dark, sweet vinaigrettes, Roquefort, the mineral-y french classic, cave aged in giant wheels, and Maytag Blue, the milder, soft american version. There are in fact, many many types of blue cheese, and I have yet to try one I didn't like.
 I'm a big fan of domestic cheese, but wanted to branch out from Maytag today, so I went with Jasper Hill's Bayley Hazen Blue. Made up in Vermont, it's about as local as a blue cheese gets in Manhattan. It has a lighter, nuttier taste, but is definitely not lacking in the funkiness blue cheese in known for. 


My childhood involved a lot of baked potatoes.  Usually served along side a piece of grilled chicken or steak, and maybe some corn on the cob. That's a fine midwestern summer dinner right there. 


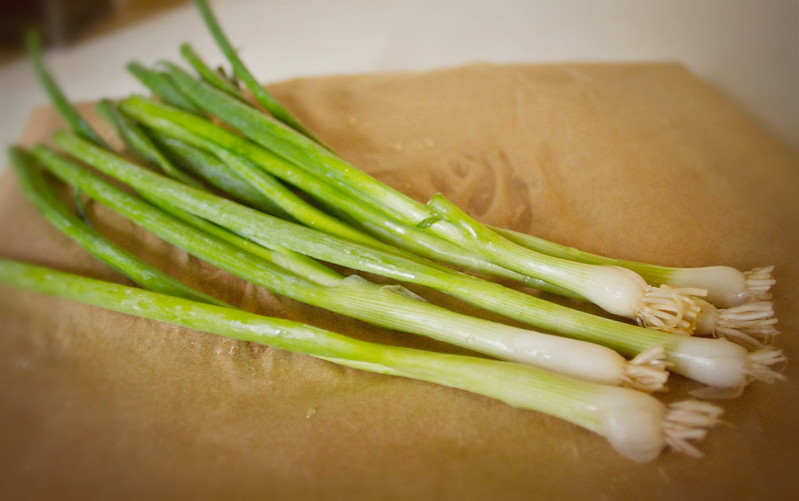
Spring onions in springtime- there's nothing better than vegetables in their prime season.


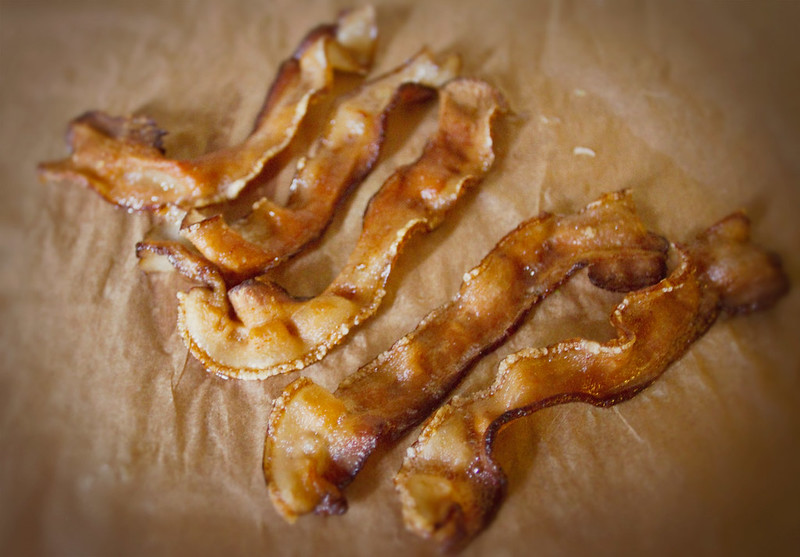
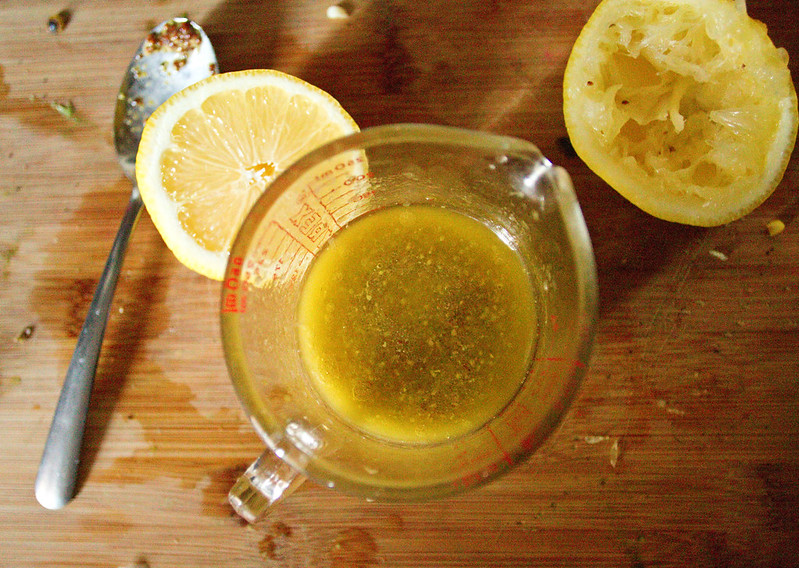
Since this recipe relies heavily on the bacon and blue cheese to flavor it you will not regret it if you pick up some especially good bacon. My Whole Foods recently started smoking their own meat and rolled out a few new bacons- this one is the double smoked. It was heavenly, the rind fries up almost like chicharron.


Fresh from the oven and piping hot, like the ones Ma would slip into the girls pockets in the winter in Little House in the Big Woods. 


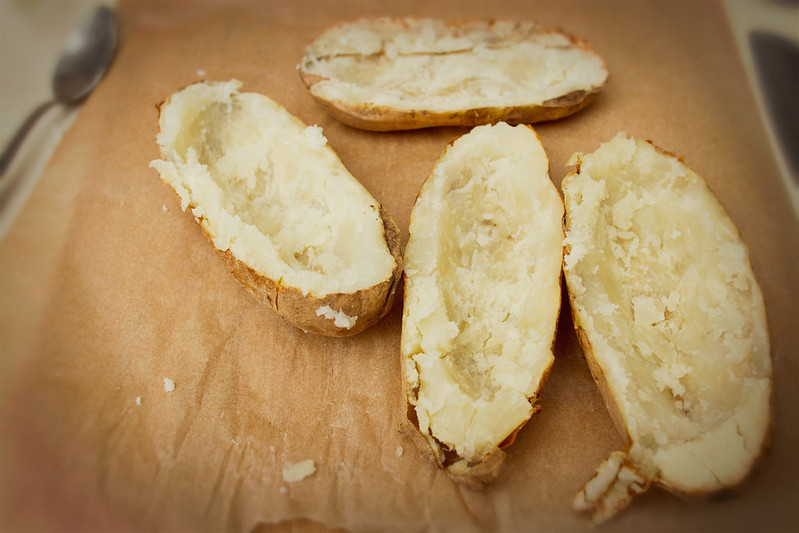
Potato boats awaiting their delicious filling.


The sour cream and the butter take the potato flesh to this very creamy, velvety level.


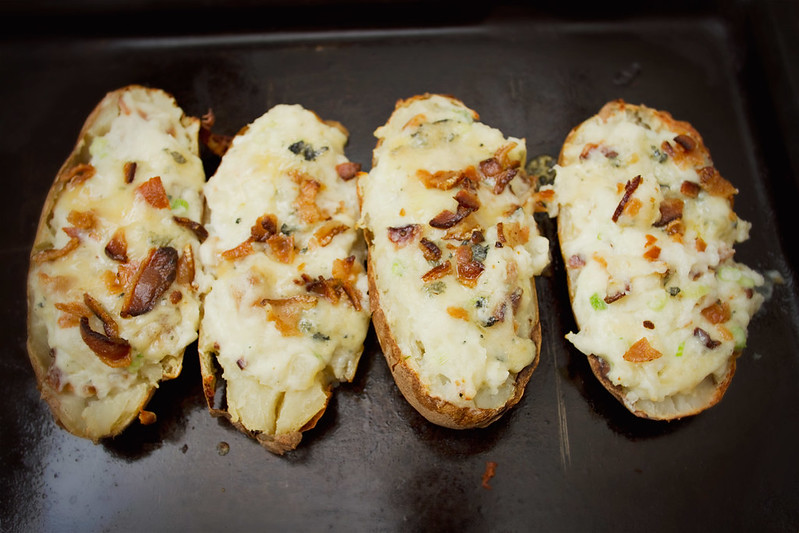
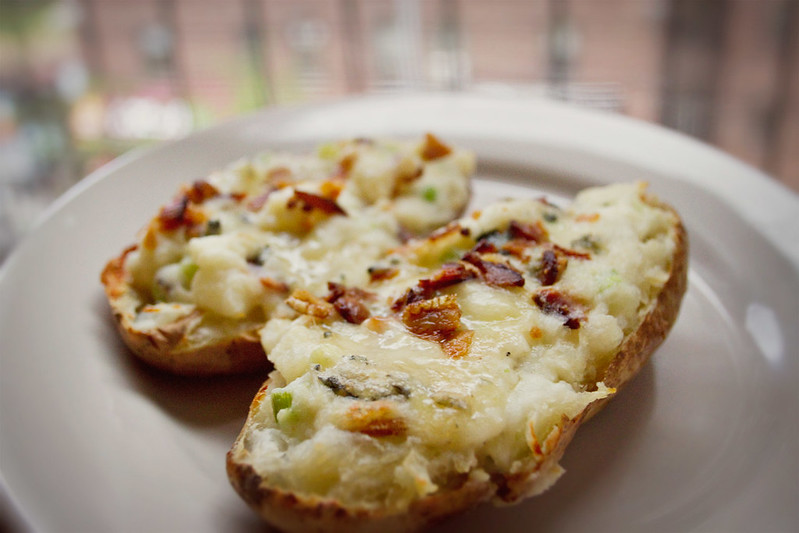
Mmmm, melty cheese, crispy bacon, soft sweet spring onions, lush, creamy potato. 


Bacon, Blue, and Spring Onion Twice Baked Potatoes
This Recipe serves two, but you could easily double everything to serve four. 


2 Russet Potatoes
5 Strips Bacon
1/4 C Blue Cheese, crumbled
1/4 C Sour Cream
1/4 C Milk
2 Tbsp Butter
5 Spring Onions

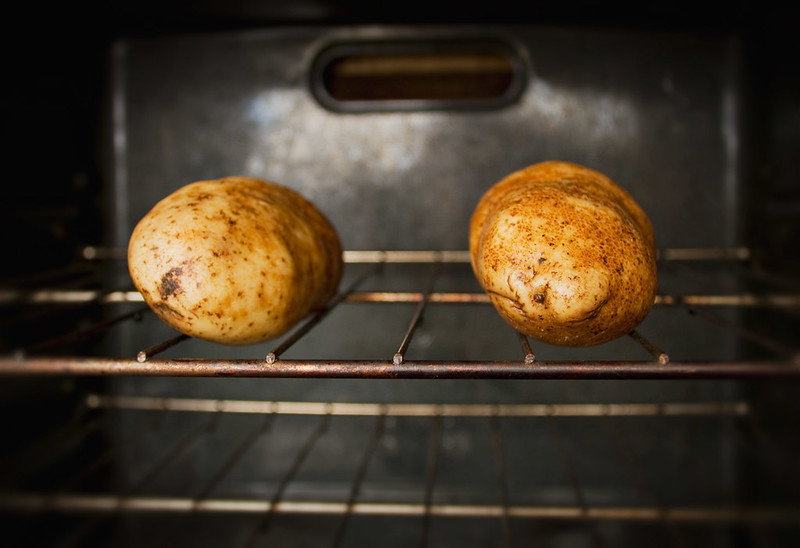
Preheat the oven to 400 degrees Fahrenheit. Wash the russets. Using a fork, poke holes all over the potatoes, about 8 times each. Place the potatoes directly on the oven rack and bake for 1 hour and 15 minutes. 

While the potatoes cook, place bacon in a cool skillet and heat to medium-low, fry bacon until crispy, remove, let cool, and crumble. 
Chop the white and light green sections of the spring onion finely, set aside.

When the potatoes are cooked through (they should give a bit if pressed with the back of a fork), remove from oven (but leave the oven on!), and cut them as evenly in half (the long way) as possible. Scoop out the potato flesh from the halves, leaving a 1/4" thick porder of potato around the edges. 

Place the scooped out flesh in a bowl, along with the butter, milk, and sour cream, and mix until butter is melted and ingredients are well integrated. Set aside a small amount of bacon and blue cheese to top the potatoes with, and mix the rest of the bacon, blue cheese, and all of the spring onions into the potato mixture. 

Place mixture back into potatoes (it's ok if it heaps out the top a bit), top with the reserved blue cheese and bacon, and put back in the oven for 10-15 Minutes, until the cheese topping is melted. 

Serve immediately. 

On Freezing: 
If you wish, you can stop after refilling the skins with the potato-topping mixture, place the potatoes in a freezer safe tupperware or bag, and freeze them for future use. When you want to use one, preheat the oven to 400 degrees, let the potato thaw a bit, then bake about 30 Minutes, until heated through and cheese is melty. 


Substitutions: 
S wanted to use goat cheese instead of blue, so that is definitely an option, though probably much milder.
 You could swap the spring onion for any manner of chive, or for ramps, or lightly caramelized leeks or onions. 
This recipe can work as a base for any manner of twice baked potatoes- cheddar broccoli, ham and swiss, queso and peppers, etc. 


Friday, May 24, 2013

Fresh Pineapple Upside Down Cake


When I was a little girl my mother made pineapple upside down cake from time to time and I thought it was deliciously exotic. Pineapple in a cake! How fancy.We definitely were not a big canned food eating house, but my mother did use canned pineapple in the cake, which I also thought was rather exotic, since we never had it and the juice the fruit came swimming in was so sweet.

These days I'm always looking to buy the least processed foods available, so when I decided I really wanted my mothers pineapple upside down cake last week, I knew I wanted to make it with fresh pineapple. And, Oh, what a great decision that was.


I called my mother for her pineapple upside down cake recipe, to which she replied she doesn't really use a recipe, but she said she would look in the ancient, crumbling, Betty Crocker and Fannie Farmer cookbooks, as one of these was probably the originator of the cake in my mothers repertoire. Then I found a Betty Crocker Pineapple Upside Down Cake recipe online while we were still on the phone discussing the idea. Oh, the joy of the internet.


So the great Pineapple Upside Down Cake feast night began.


In about an hour this will be a layer of heaven. Absolute heaven.


A layer of delicious cake batter, the future bottom of the cake. 

See that little bit of caramel oozing through the corner? Yum. 


Oh yeah, there's that caramel-pineapple goodness.


Oh gosh. Cake perfection.


Fresh Pineapple Upside Down Cake


1/4 AND 1/3 cup butter measured separately 

1 2/3 cup packed brown sugar

1 Fresh Pineappple, sliced into 1/4"-1/3" round slices (or one can sliced pineapple)

1 1/3 cups all-purpose flour (I use unbleached, unenriched King Arthur)

1 1/2 teaspoons baking powder

1/2 teaspoon salt

3/4 cup milk

1 egg

First you'll need to cut your pineapple. If you're using canned, skip this paragraph. But really, consider using fresh pineapple, there is a noticeable taste difference, and this is much easier than it looks. Using a large knife cut off the very top, beneath the leaves, turn it over, and cut the bottom off as well, so the pineapple can stand on its flat bottom easily. Stand it up, and using the large knife cut down the sides of the pineapple, just behind the prickly skin. If your pineapple if fresh it should be pretty easy to cut through. The main trick is balancing cutting far enough behind the skin to remove it all, without cutting off too much edible flesh. Now slice the pineapple into 1/4"-1/3" slices, you'll need between 6 and 9 depending on your pan layout and pineapple width. Use a pairing knife to cut the circular, tough centers out of each slice.

Heat oven to 350°F. In 9-inch square pan (or if your pans are limited like me, a rectangular pyrex), melt 1/4 C butter in oven, brush small amount of melted butter up sides of pan to grease, leave the rest of the melted butter on the bottom. Sprinkle 2/3 C brown sugar evenly over melted butter. Arrange pineapple slices over brown sugar. 

In medium bowl, beat remaining ingredients (including remaining butter and brown sugar) with electric mixer on medium-low beat ingredients, scraping bowl occasionally, until batter fully comes together and most lumps are gone, 1-2 minutes. Pour batter over pineapples.

Bake 50 to 55 minutes or until toothpick inserted in center comes out clean of batter. Immediately place heatproof serving plate (or cutting board) upside down over pan; turn plate and pan over. Leave pan over cake a few minutes so brown sugar mixture can drizzle over cake; remove pan. Serve warm. Store cake loosely covered.


Substitutions: 
Other fruits could certainly be used in an upside down cake- plum or ripe peach would be delicious.
You don't need a mixer for this recipe if you have a strong mixing arm, but beating times will be slightly longer.


Share on Tumblr


Monday, May 20, 2013

Vanilla Bean Orange Blossom Coconut Panna Cotta


Milk and I have never gotten along, which is a shame because I love dairy products. Cheese, whipped cream, greek yogurt, cheese cake, pudding, creme fraiche, we're talking about some of my favorite foods and ingredients here, and let's be honest, most milk substitutes suck. Soy milk is terrible for you. Hemp milk (despite my serious love of other hemp products) tastes terrible. Almond and rice milk don't really cook down the way a dairy substitute should.
Then there is coconut. Thank god for coconut. It's thick and creamy like milk, thickens when it cooks, and you can even skim the cream from a can and make coconut whipped cream! Sure it has a stronger taste than most milk substitutes, but that taste is DELICIOUS in sweets (and certain savory dishes).

These are a wonderful alternative to traditional pudding or panna cotta. The taste is light and summery, and the consistency is lovely. I've made many versions of coconut pudding over the years, but this may be my favorite. They're very fattening though, so maybe don't make these every night, no matter how tempting it is. Hey, atleast it's good fat! 
I'm not one for diet-crazes, so I'm not claiming to buy into that coconut oil for weightloss spiel, but it is a bit of a wonder food. 


Zest all sides of your orange.


The start of something lovely.


Sliced open bean, if you look closely you can just barely see its delicious brown vanilla flesh waiting to be scooped out.


Whisk whisk whisk away.


Ramekins eagerly awaiting their filling.


Waiting for them to set is definitely the hardest part of this recipe.


Perfect little cups of heaven.

This is a simple, easy, but really impressive dessert which can easily be made vegan by swapping the gelatin for agar agar. I adapted this recipe from Shop Cook Make's vegan Vanilla Coconut Panna Cotta, I was originally going to make it without adapting, but then I really, really wanted to throw some orange zest in there. 
My one recommendation is this, look at the ingredients in your coconut milk. I have to buy the full fat in order to get a can without guar gum (a harmless thickener) or carrageenan (a dangerous thickener). Pure coconut milk,  made from the water and flesh of a young coconut will always taste best. 
Ok, now I sound like a food-fear mongerer. On to the eats.


Vanilla Bean-Orange Blossom Coconut Panna Cotta

1 envelope Gelatin (or 2 tbsp vegan gelatin like agar agar)
2 Cups Coconut Milk (I used full fat for this, but think light would work)
1/2  a Vanilla Bean
3-4 tbsp Brown Sugar
1 Medium Orange
1 tbsp Water
3 Tbsp Coconut Flakes or Slivered Almonds or Pistachios


Zest your orange using a zester or a fine cheese grater, rub the skin of the orange against the grater until it has zested down to the white pith. Don't zest the white pith, just the orange parts, they're the flavorful bits.

Combine coconut milk, brown sugar, and orange zest in a small sauce pan. 
Slice open vanilla bean the long way (I do this by holding ht ebean down flat and running the point of my knife from top to bottom, splitting the skin), using the tip of your knife scoop out the dark flesh of the vanilla bean, and add it, and the bean to your sauce pan as well.

Place saucepan over medium heat, and cooking, constantly slowly whisking for 5 minutes.

With 1-2 minutes of your five minute cooking time left, set aside the stirring for  moment, and combine your water or gelatin and mix well. 

When the 5 minute cooking time is up, add the water/gelatin mixture to the sauce pan, turn heat to medium-high, and whisk constantly, cooking for 2-3 minutes.

Remove from heat and pour immediately into ramekins, custard cups, or other small serving bowls.
Refrigerate about 4 hours, or until about as firm as flan.

While they chill, toast your nuts or coconut flakes in a dry pan over medium heat until the nuts or coconut flakes turn a light golden brown.

 When the panna cotta is ready to serve, sprinkle with the toasted nuts or coconut flakes. 
Eat these out of the ramekins, they're not meant to be unmolded. 


Share on Tumblr

Tuesday, May 14, 2013

Guaco Tacos


There is an indoor farmers market of sorts near my Chinatown apartment, called the Essex Market, which houses several great food establishments, a fantastic little local cheese shop called Saxelbys, the great and venerable Shopsins General Store, and a little taco stand called the Brooklyn Taco Co. Though it is on the wrong side of the river for such a name, they serve some incredible tacos. The first time we tried them, S and I were both smitten with the  Guaco Taco. How could something as simple as avocados and corn with a hint of lime and the typical taco toppings be so delicious? So Perfect? But it is. Oh, it is. 
The recipe was simple enough to mimic, and we have been successfully making delicious Guaco Tacos at home ever since. I hope you'll enjoy them as much as we do.
Recipe at the bottom.


Easy pickling red onions,


The perfect taco topping.


Apple Cider Vinegar- turns any vegetable into quick pickles.


I cannot wait for corn season. There are so many fantastic sweet corn dishes to make.


Pop those lovely bicolor corn ears directly onto the fire.


Those beautiful, blackened kernels are exactly what you want. Move the ear around on the burner to get the tops and bottoms as well.


Those are some perfectly roasted ears of corn, some parts totally blackened, some barely burned. This makes a nice mixture of corn flavors when you mix it with the avocados.


For this recipe you want to pick avocados that are starting to soften but are still a good deal firmer than an avocado you would use in guacamole. They should be firm with a bit of give, not brown inside. But one or two squishy avocados will certainly not ruin the dish.


Delicious, velvety avocado pieces.


De-kernel the corn cobs. 


Two of my favorite vegetables in one bowl.


Add one of my favorite fruits.


Mix until it becomes lumpy half-guacamole deliciousness.


Toast some corn tortillas.


These are delicious, filling but not overly heavy, with a distinctive taste of summer to them. 


Guaco Tacos

4 avocados
1 lime
1 cup cilantro, chopped
1 small red onion
2 ears corn
Approx 1 cup apple cider vinegar
water
salt
pepper
6-10 small corn tortillas

Pickled Onions
First, if you want to pickle to onions, do it first. You by no means have to pickle the onions, but if you like pickled things, it is delightful. Chop your onion in half, then slice into thin half moons, then slice those in half. Place in a 8oz jar (or a tupperware, if you don't have a jar), fil 2/3 of the way with apple cider vinegar, then top with water, add a 1/4 tsp salt, cover and place in fridge. 

Tacos

Shuck the corn and place the bare ears directly on the burners of your gas range. If your corn has one of those natural stalk handles, leave it on. (If you don't have a gas range, check out this recipe  on oven roasting corn. You won't get the same blackened corn, but it will be effective.) Turn heat to medium low, so the flames lightly lick at the corn kernels. They will eventually start to sizzle and pop, check them regularly and turn the ears as they blacken, to evenly cook all sides. Once all sides have some blackening, turn off heat and remove the corn. Set aside the corn ears. 

Peel and cube the avocados however you like, this is what I do: slice the avocados in half, with a large knife and remove pits- to do this I thwack my large knife pretty hard into the avocado pit, so it sticks into it, then I twist it lightly and lift to remove the pit, which can be removed from the knife by running it along the edge of your sink, so the pit falls into the sink. 
To slice avocados, I run my knife along the inside, the flesh side, of the halves, but not through the skin in the back, then peel the skin away form the slices. Cut the slices into little cubes and dump them into a big bowl. 

To remove the corn from the ear, stand the corn up on the narrower side, holding the wider base, or the stalk if the corn has one, then using your large sharp knife, cut the corn away from the ear straight down from the top to the bottom. If you don't cut it down to the bottom of the kernels, you can take a second pass. You won't really be able to cut off much of the ear beyond the kernels because it'll feel distinctly firmer and harder to cut. Remove kernels from both ears of corn and add to the bowl with the avocados. 

Cut the lime in half and add the juice of one half to the avocado-corn mixture. Add a dash of salt and a healthy grinding of black pepper. Using a large spoon, mix and occasionally mash the avocados-corn mixture until it resembled half-mashed guacamole, or until it reaches the consistency you desire. I like mine to be very chunky, but held together with mashed avocado. 

Toasting the corn shells

Again, this requires a gas range. If you have an electric range, just skip this step and make your tacos.
Place a taco shell on each of your burners and turn them on medium-high. Let them toast up 5-15 seconds per side, then flip using tongs (or if you want to be like me, blow on the flames so they all blow to one side, then quickly grab the tortilla on the flameless side with your fingers and flip.) toast on the other side for a few seconds, and remove from the flame.
The length of time before you flip the tortillas depends on how toasted to like them, and on the brand of tortillas you use. The Whole Foods ones I use get too crispy if you let them toast more than a few seconds per side, but I've other brands you can toast for much longer before they get crispy. It's a bit of trial and error, but very delicious.

Assemble your tacos, putting the avocado-corn mixture on top of a tortillas and topping with cilantro, red onion (pickled or not), cilantro, and a squeeze of lime from the half you saved earlier. 
Enjoy!


Thursday, May 9, 2013

Roasted Spring Vegetable Salad


Roasted Spring Vegetable Salad

This is a lovely salad for a spring bicycle picnic, or a rooftop garden potluck, or just a rainy, gray May day. In fact, with its sunny lemon dressing and pink pickled radishes, it's the perfect pick-me-up for a wet day (or week) like the one we're having in New York.
I was inspired to make this salad by Smitten Kitchen's Spring Salad with New Potatoes, but it's a pretty different adaptation, with different cooking methods and pickled items, and a lemon-y dressing. 
This salad lends itself well to substitutions, I started with what was in season locally in my area, and you should feel free to do the same. 


I love home pickling and it can be incredibly easy if you're not trying to preserve the pickles for months.


Radishes and onions both make great quick pickles, they start to taste vinegary and brined after just an hour or two. These only pickled for the amount of time it took me to make dinner.


Fill halfway with apple cider vinegar. You could probably make these with white vinegar too, if it's all you had.


Yes, I am quick-pickling in an old tahini jar. 


Any sort of potato will do for this, but new potatoes cook quickly, and their roasted flesh is soft and creamy. You don't need tri-colored potatoes either, but it does make the salad more colorful.


chop up your asparagus into one inch segments. Note the radishes pickling away in the background.


Some olive oil, salt, and pepper, and they're ready to roast.


While the vegetables roast, whisk together your dressing ingredients.


Roast until the potatoes are golden outside and creamy inside, and the asparagus is softened.


Mmmm, lightly pickled goodness.


Colorful and delicious. Perfect picnic food.


Roasted Spring Vegetable Salad Recipe

Roasted Vegetables:
1 Bunch (approximately 1 pound) Asparagus
1.5-2 lbs New or Peewee Potatoes
Olive Oil
Salt and Pepper

Pickled Vegetables:
How many pickled vegetables you make is up to you, the amount I've listed here is probably 2x what you need for this salad, so feel free to 1/2 it, but consider making extra- they make great add ons to normal salads too!
8-9 small Pearl Onions
5-7 Radishes
Apple Cider Vinegar
Water
1 tbsp honey
1 tsp salt
1/2 tsp pepper

Dressing:
2 Tbsp Stone Ground Mustard
1-2 Tbsp Olive Oil
Juice of 1/2 Lemon
salt and pepper to taste

First, make your pickles. If you don't like pickles, then you could just slice the radish and onion thinly and add them raw, but I like pickles. I love pickles. 
Peel your pearl onions and thinly slice your radishes, then add the whole onions and sliced radishes to a jar. Fill halfway with apple cider vinegar, add the honey, then fill the rest of the way with water. Add the salt and pepper, cap, make sure it's not leaky then give it a light shake and pop it in the fridge. 

Preheat the oven to 400 F
Cut the potatoes small, if using larger potatoes, 1/2 inch cubes, if you're using little peewee potatoes like I did, cut the small ones in half and the big ones in quarters. Toss with a bit of olive oil, salt, and pepper, and pour onto 1/2 a lightly oiled jelly roll pan.
Cut the tough ends off the asparagus and slice into 1" segments. Toss with olive oil, salt, and pepper, and pour onto the other half of the lightly oiled jelly roll pan.
Roast for 20-30 minutes, until potatoes are golden on the outside and soft inside, and asparagus has softened. Remove from oven and set jelly roll on cooling rack, or near window, to cool vegetables to room temperature. 

While the vegetables roast or cool, prepare the dressing. In a small bowl or a measuring cup whisk together all ingredients. Whisk again immediately before using.

Remove 4-7 pearl onions from the brine and cut into thirds. Once the roasted vegetables have cooled, combine the pickled and roasted vegetables in a bowl and slowly add the dressing while mixing the salad, until everything has a light coating. 
Sprinkle with coarse salt (or regular salt) and fresh ground pepper, and serve.


Substitutions:
Roasted Vegetables: sunchokes, beets, brussel sprouts, or summer squash could all work well as roasted components of this salad.
Pickled: thinly sliced cucumber, thinly cut shallots or yellow onion, leek, or spring onion
Raw: you could add raw components to this as well, such as thinly sliced carrots, or even apple.


Share on Tumblr